Search This Blog

Tuesday, May 28, 2019

LotR SBG Wargs

Ok, so my next project was set to be a box set of wargs and the 3 lead war riders from the Warg Attack box set.... It was a busy holiday weekend and I only got to my Wargs.... the riders are started, but nowhere near complete.


Above is the original group... glued and primered, awaiting basing.


The color pallet was very small. I used all Games Workshop paints except the grey (hidden in the back behind the XV86) used for the warg's muzzles. For that I used an IWM grey. The biggest issue I had was matching the brown used for the fur highlights and the ground highlights... My original wargs and warg riders were done a while back and I used a GW medium brown.. I forget the color, BUT... according to their new chart, it was supposed to be a match for Mournfang brown.... it was not a match... it wasn't even close! I had to blend the Mournfang and the XV86 to get the correct color. It wasn't too difficult, but it was a step I didn't think I had to do.


I used a variety of browns for the warg and the base... they closely match each other, but not quite. I used the chaos black for the eyes and some highlights or "lowlights", Bleached bone was used for the teeth and Evil Sunz scarlet for the tongues, while the faces/muzzles were a blend of IWM grey and GW chaos black. It was really a matter of blending the colors to get the shading and the dry brush colors. Below are the base models before finishing touches of more highlights and static grass.


You can see a close up of the two different styles of Wargs that come in the kits below... three of each pose. One thing I regret not doing is using a little green stuff to blend out the small gaps around the necks where the model pieces come together. This is what separates me from professional painters... I could have gone that extra yard, but forgot and didn't think of it until it was too late... I am still happy with my final pieces though... they are a tad better than tabletop/wargame quality but are far from collector's quality.


A quick shout out to Galeforce 9! I love their static grass.... (and other products). I primarily use Games workshop and Galeforce 9 for static grass. I used the Galeforce 9 stuff as it is the same grass I used for the original models done a few years back. While I am on the subject... I also did not use any Army Builder grass tufts.... I love them and I may go back and add them... but it would have to be on both the new and old Wargs... including the old warg riders too!


Here they are... a lot can be desired of my photo taking skills... I just use my camera phone for all of these pictures.


Here they are by model/pose group... a little closer, but about the same for quality of pictures. To be honest, they are not quite finished yet... I still need to seal them in matt varnish! I'll be doing that tonight.

 
In the end, I enjoyed painting them.. I always enjoy painting! Any time I get behind the brush is good time! I really hoped to get all of them done, warg riders included... I will get them done this week and then move on to something... I actually haven't thought that through yet. I have so many projects I haven't even debuted here yet! Most likely it will be more Lord of the Rings SBG stuff, but it could be something different... I'll cross that bridge when I get the other warg riders done.


I will be going over points for the game and reviewing what the warg riders and lone Wargs come out to be.... I know I have enough for a Battle Company, but as a unit, how many Wargs are practical in an army? I currently have 8 warg riders which includes a hero.. Sharku.... and then 12 Wargs.... I am thinking I only need 8 Wargs... 4 might find their way to the next HMGS flee market.... it all depends upon how the points add up. I have already taken into consideration that Wargs, once rider-less can stay on the table top and continue fighting... unlike horses who flee the battlefield. I know warg riders cost basically 26 points each, with Sharku being 60 points on a warg... not sure how much a Warg by itself costs... Sharku and the riders would cost 242... a nice unit for an army, but no army by itself, even with some Wargs, it still wouldn't hit the 500 point mark. We shall see....

Monday, May 20, 2019

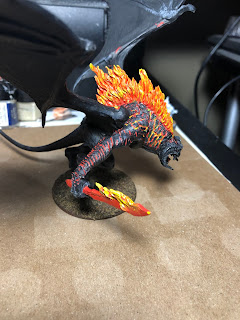
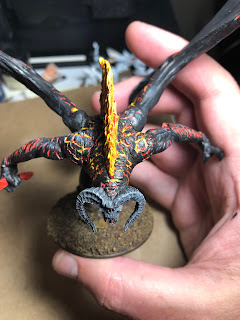
Finshed Games Workshop Lord of the Rings SBG Balrog of Moria

Just a quick update... I think the Balrog of Moria is as finished as it is ever going to get...... It was a long time coming and a hard road to walk, but with the advice of others, I have finally gotten it to the point I am happy to game with....


 I went back and added yellow highlights to both the larger areas of red and the edges of some of the black "scales". I am happy with the final effect, but still keep thinking it could be better... I could do it better....

 
 I like the way the fire blended. I wet blended the orange, red and yellow and then went back when it dried to add solid coloring on the highlights. As I mentioned before, all colors were from GW except the steel which was used for the broken dwarven axe on the base. It was the IWM I really like using. I also went in and added a single piece/plug of Armory static grass.

 
I think in retrospect, the hardest part of this whole model was the forearms... trying to get the red from the fire and black from the scales blended over each other was an absolute nightmare. There was no clear cut separation between where the two colors should/could.. would eventually go.


 Above, the picture on the right is the model after a nice, heavy coat of matt varnish was applied... I did this as it gave the model that bright shine I was looking for.. not necessarily a gloss finish, but it brought out the colors from flat to what I would say is "just right"...


All in all, I am happy, but know I could do a bit more.... perhaps I might go back someday, but I highly doubt it. I have far too much un-painted lead, plastic and resin from so many other games! I will call this finished and done nicely... it is definitely a very high quality table top standard... I don't tend to go much beyond that as I want to get on to more painting or perhaps... maybe... even playing....


Up next... another quick bit of low hanging fruit! I currently have 6 wargs and 5 warg riders.... (both GW plastic sets).. there used to be 6 riders, but I have no idea what happened to the 6th... anyway, this works out as my OCD will not allow me to ever play an odd number of figures..... So, to wrap up the Isengard mounted force, I have 6 more wargs and the GW LOTR Warg Attack box set to complete.... The six plastic wargs will give me an even number of 12 to work with and the Warg Attack box set comes with Sharku, 2 mounted orcs, mounted Aragorn and mounted Théoden.... The warg riders are armed with a sword (Sharku) and then a spear and bow armed orc. These 3 and my 5 will give me 8....


I assembled, based and primed both box sets. The plastic warg set was gotten second hand and didn't have any riders. If it did, I would have added in at least 2 more warg riders.... alas it didn't.. they all will be painted as wild wargs or dismounted steeds. This kit is very nice and went together very well. The Warg Attack box set... not so much... all were lead models and a bit fidgety. It wasn't so much the assembly and, it could have been my glue... but getting them to stay affixed to the base took some effort. Otherwise, the models themselves went together very nicely... there were few if any gaps and they are all small enough so as to not require any greenstuff or filler. As for paint, I will be following the same color scheme I used so many years ago on my other riders and wargs. I'll set Aragorn and Théoden aside for now.

Thursday, May 16, 2019

Completing Moria!

Well, it has been a loooong time in the making, but I finally decided I needed to finish all of my Moria project. With the recent completion of my Moria goblins, I finally decided to tackle the Balrog. Mind you, this model has been my DooM for many years now. It has been looming in my past, coming back time and again to haunt me.....


I originally bought the model when it first came out. That was what? almost 20 years now? Holy shit, time flies..... Anyway, my Moria goblin army was one of the first I ever started. My original batch of goblins came with the original Fellowship box set. It was my first purchase that would lead me to pretty much a life long career of painting GW LOTR figures.....


After I had painted so many dwarves, I needed a break.... I finished my SAGA Milite Christie 4 point war band and even some historic figures... I have 6 more dwarves to paint, but I still haven't been motivated to paint them.... yet. In the interim, I found myself looking for something to do. With my youngest now playing... and pulling out various armies to look at.. I saw that I had about 8 more goblins to finish... I am missing some of the minor heroes and I don't own any of the Blackshields.. I'll get them sooner or later.. but my army.... I have 18 goblins w/spears, 18 w/sword & shield and 18 with bows..... on top of that, I have Durburz, the shaman, drum set and 3-4 blisters of the lead goblins which I now uses as goblin captains as they are uniquely different in their lead poses...


So, I found I had only 8 more to paint.... I finished them..... the 2 extra in the picture were pulled out to use as reference for painting the others.... of course, in the background.... there sit the 6 unpainted dwarves...


The color scheme I matched up as closely as I could. all GW colors.... except the steel.. that was IWM.... red, steel, black, browns and tan. I have never been a fan of GW "green" orcs and goblins... at least NOT for LOTR. I know a few made it into the movie, but it didn't fit my vision.... so I opted to ignore any green goblins. The 8 painted up very quickly. I hit a few with some highlights and then sealed them in mat varnish.


A couple different pics as I varnished them.


I have to be honest.... it really was a great feeling.. knowing I would not be painting any more rank and file goblins for this game... ever again.... (I know I just cursed myself). Anyway, aside from getting some of the missing heroes and possibly the Blackshields... I am done with the Goblin Army of Moria.... or so I thought. My son and I watch a lot of battle reps on YouTube.... and, of course... there was one with a Moria goblin army and it was being led by the Balrog.... My son asked... I answered and then I felt guilty... I went and dug out my old model and stared at it for what seemed to be hours.... Finally, at long last... its time had come.... this would be my next project. It was dusty.... it still is and is visible in some of the pics. The Balrog is a large model and I didn't have it inside any storage, just on a shelf.


Mind you, the pics below do not show the completed model... when I pulled it off the shelf it was just patches of black and red.... at the time, I tried following a painting guide and soon just threw up my hands saying I couldn't do it.... I pondered long at how I was going to complete this beastie. I finally settled on repainting all of the red. I then brought the black up to the edges and then painted the black scales or floating crusts like on a lava flow.... this is how it looked and how so many other folks had painted it. I went back and forth between red and black to try and dress edges, straighten lines, etc.... it was a true lesson in patience.... I am still not done and almost threw my hand sup again in disappointment and failure.... Instead, I opted to take my frustration out on dressing up the flames on the back and sword. I mixed red and yellow to get orange and many other shades in between. I line painted and dry-brushed the fire on the mantle and sword. It brightened my mood and I relaxed. It isn't done yet, but I am happier with the model as it now looks mor elike it should.


I was undecided on the sword as it IS a solid object.... bone perhaps? I wound up painting it as a glowing red iron sword, fresh from the forge. I blended the red to orange and then yellows with a hint of white at the top. This was the same process I used for the fire mantle on the back.


Now, with this under way, the red between the outer skin looks bland.... I am going to go back in and ad some very fine yellow lines to help blend the flames into the skin better. I think this will give the effect I have been searching for.
 
 
 Some pictures from other angles of the fire and body. The base can be seen in its unfinished state. It is starting to improve and I am confident that I can see the light at the end of the tunnel on this one!

 
 When I get to a happier place with all of the fire.. light and dark... I'll go back in and hit highlights on the black with a few shades of grey. Below you can see some of this on the face... I hit other areas too, but I will be going back and cleaning all of this up when I am done/satisfied with the fire effects.


I just cannot believe how long this has taken me to get up enough motivation or courage or whatever to try to finish this model.. it has been my opus for a long while and it is about time I close this chapter in my painting career!

Wednesday, May 1, 2019

WARHEAD Studios.. an unexpected interlude

Ok, so I am on Face Book and a guy makes a post in the Lord of the Rings Strategy Battle group that I belong to.... There is this company in Poland making resin terrain called WARHEAD Studios... and it appears perfect for Rohan.... I have a variety of scenery that could be used for Rohan, but this stuff looks like it was made for them. I followed the link and went to their web site and lo and behold, they are running a special! I looked over their range, which is small for the moment, but growing... they are a new company. After a little searching ion the net, I decided to give them a shot. I bought the village starter and an extra set of palisades. The village starter came with 2 buildings and a set of their palisades.... I instantly saw that I would be wanting/needing more to do a proper Rohan settlement. I placed the order and my stuff came in fairly quickly. As they are a new company, they threw in a free set of ruin stones for my business. Unnecessary, but very cool!

 
The large box consisted of 4 smaller pre-packaged boxes. 2 boxes had houses and 2 had the palisade sets. They were packed well in bubble wrap and snugly fit into the boxes. Nothing arrived damaged.


 The pieces had gone through a general cleaning prior to shipping and packaging. there was very little to clean up other than a few small bubbled on the inside of the resin castings.
 
 
Their logo and box label.


Some Shots for scale... these are dang near perfect for Games Workshop LOTR Strategy Battle games!


More shots for scale. I think they look great and will look awesome once primed, painted and possibly based. I am trying to decide if I want to make a solid hill fort or leave it all in pieces so it will be versatile...


All in all, I very nice set!


This is one set of palisades assembled... 


The houses... unassembled. I did a dry run fit test.... then went right to gluing them. They went together very nicely with using regular super glue... Some pics below to see how that went... they were very square when assembled for the final product. I did leave the roofs unglued for the moment. You can see very little gaping on the exterior.. this made me very happy!


As I said, quite square... all parts lined up well and fit well.. I had a slight crack on the first house assembly, but I think this is more due to me, rather than actual fit. The second house went together without a single gap or issue...


Completed houses for scale and measurements.


Below you can see the one corner I messed up...


Above you can see the starter set they were selling... 2 houses and one set of palisades... Below you can see why I bought an extra set of palisades... There is room for another house or two... but most likely, I will put in a well and garden, etc....


All said and done, here is the fort set up as I intend to use it and the extra pieces I had after I was done.


End result, I am very happy with Warhead Studios! I would and will buy more form them as their product line grows. They are just starting out and doing a fine job. Cost was very affordable, shipping time was acceptable and they had a product I wanted that was not able to be filled by a US seller.

This should be a nice project to work on while I struggle over what to do next miniature wise! the next post with these pieces will be the completed ones. I plan to prime the whole set a darker grey, maybe even use some darker brown too.... then bring up the layers of grey on the stone through dry brushing lighter grey colors and then for timbers, it will go the same way.. starting with a darker brown and then bringing up the layers and highlights. I am looking forward to doing these a lot!